Connect with us

Travel

The Essential Guide to Safe and Efficient Camper Leveling

Published

on

The Essential Guide to Safe and Efficient Camper Leveling

Table of Contents

  • Why Camper Leveling Matters
  • Common Leveling Challenges
  • Different Leveling Methods
  • How to Choose the Right Leveling System
  • Step-by-Step Leveling Guide
  • Top Safety Tips for Camper Leveling
  • Maintaining Your Leveling Equipment
  • Extra Tips and Tricks

Use leveling blocks, ramps, or automatic systems for safe and efficient camper leveling. Regularly checking the level ensures stability and prevents appliance issues. Proper leveling enhances comfort, safety, and overall functionality, making your camping experience more enjoyable and stress-free.

Why Camper Leveling Matters

Properly leveling your camper is crucial for various reasons, including ensuring the correct function of appliances, improving comfort, and enhancing safety. One essential tool that can help achieve a flat surface is camper levelers, which can prevent many common issues that arise from uneven settings.

Ensuring your camper is level has practical implications beyond just comfort. For example, refrigerators often require a level surface to function correctly. Additionally, water may need to flow properly in sinks and showers, causing unnecessary inconvenience. Moreover, the structural integrity of your camper remains uncompromised when it is consistently kept on a level plane, enhancing both the safety and longevity of your vehicle.

Common Leveling Challenges

Leveling a camper can be challenging due to several factors, such as uneven ground, lack of proper tools, and even adverse weather conditions. By anticipating these obstacles, you can prepare better solutions and handle situations more effectively. Many campers need help to gauge the levelness of an area accurately, especially in wild terrains. With proper leveling tools, achieving a flat surface can become smooth. Environmental elements like rain can also slip the ground, complicating the leveling process further.

Different Leveling Methods

There are various camper-level methods, from simple manual techniques using blocks and ramps to advanced automatic leveling systems. Upgrading your RV leveling system can provide added convenience and precision, making the leveling process much more manageable.
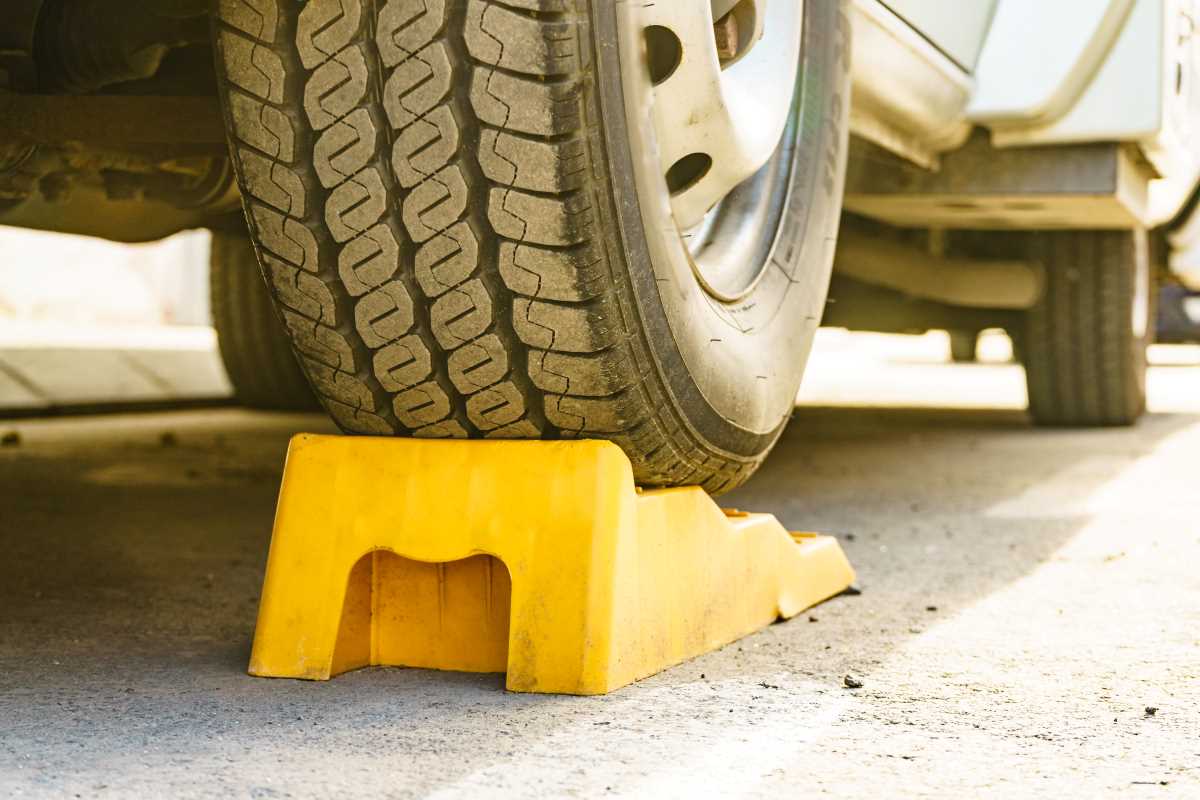
Manual Leveling

Manual leveling typically involves wooden boards, plastic blocks, or ramps. It’s a cost-effective solution but requires physical effort and a good eye for detail. This method provides flexibility, allowing you to adjust until the camper is perfectly level. However, it demands your undivided attention and can be time-consuming, particularly for beginners.

Automatic Leveling Systems

Automatic systems offer high convenience by using hydraulics or electric motors to adjust the camper’s position. While more expensive, they save time and considerably reduce manual labor. These systems often come with remote controls, enabling you to make adjustments with minimal effort. Automatic leveling systems are particularly beneficial for frequent campers, making the setup process quicker and less strenuous.

How to Choose the Right Leveling System

Choosing the best leveling system depends primarily on your type of camper, frequency of use, and personal preferences. If you’re a weekend traveler, a manual system might suffice. However, frequent or full-time campers might benefit more from automatic systems due to their ease and reliability. Weekend warriors can find a reliable balance between cost and efficiency in manual systems. In contrast, those on the road for longer might find the investment in an automatic system well worth the convenience and reduced physical strain.

Step-by-Step Leveling Guide

  1. Park your camper on a relatively flat surface. Try to find an area with minimal slope.
  2. Use a bubble level to check the horizontal level. Position it on a flat surface inside the camper, ideally where you can easily read the gauge.
  3. Place leveling blocks or ramps under the wheels that need elevation. Engage your parking brake to ensure the camper stays stationary during placement.
  4. Slowly drive the camper onto the leveling devices. Move cautiously to prevent overshooting the blocks or ramps.
  5. Re-check the level and make any necessary adjustments. It may take a couple of tries to get it just right.
  6. Once level, lock the wheels in place using chocks. This will prevent any structural shifts while you move around inside the camper.

This step-by-step guide can make the process straightforward and efficient, allowing you to enjoy your camping experience without hassle.

Top Safety Tips for Camper Leveling

Safety should always come first when leveling your camper. Ensuring that your camper is securely chocked is paramount. Take your time, and never rush the leveling process. You must use safe DIY RV leveling techniques to keep you and your loved ones safe and ensure a secure environment.

Always double-check the deployment of chocks before you start leveling. Avoid sudden movements or hasty corrections, leading to accidents or equipment damage. Have someone guide you as you drive onto ramps or position blocks. This extra pair of eyes can be invaluable in ensuring each process step is carried out safely.

Maintaining Your Leveling Equipment

Regular maintenance of your leveling equipment can ensure its longevity and reliability. Clean your tools after every use and inspect them for wear and tear. Replacing worn-out components promptly can save you from more significant issues. Regular maintenance also involves checking hydraulic or motorized parts for leaks or malfunctions, ensuring all mechanisms work smoothly when needed.

Store your leveling tools in a dry, protected environment to prevent rust and damage. Perform periodic inspections to see if any part has deteriorated or needs replacement. This diligence can save you from unexpected breakdowns when you’re out in the wilderness, far from repair shops.

Extra Tips and Tricks

Pro campers often carry extra wood blocks and a high-quality level for backup, ensuring readiness for various situations. Using additional visual aids like a bubble-level app could enhance accuracy. Some campers also use wheel stabilizers to maintain a firmer hold, reducing the chances of their camper moving once it’s level. These little adjustments can make your camping experience much smoother.

Another helpful tip is to mark your usual lever points on the blocks or ramps for quicker setups in familiar locations. Additionally, keeping a checklist of the leveling steps ensures you don’t miss any crucial actions, promoting a safer and more efficient leveling process every time.

Continue Reading
Click to comment

Leave a Reply

Your email address will not be published. Required fields are marked *

Travel

Tserko Ri: Mountain Peak In Langtang Region Of Nepal

Published

on

Tserko Ri: Mountain Peak In Langtang Region Of Nepal

The Langtang National Park area has the high peak known as Tserko Ri. It is located northeast of Basen-Powell Peak and southeast of Tsanbu Ri Peak. Tserko Ri summit is located at 5033 meters above sea level. This summit is not on the main Langtang Valley trekking path. But those who enjoy a little extra adventure usually include a visit to Tserko Ri in their holiday plans. 

Kyanjin Ri Peak is the highest peak in the Lantang Valley walk. It is a short distance from Kyanjin Gompa, a hamlet in Latang. A well-liked location for sightseeing is the Kyanjin Ri Peak. The peaks and glaciers encircling the Upper Langtang Valley are seen from this location. One sees landscapes that include the Lantang Lirung glacier and the entire mountain. The location is well-liked for its views of the sunset and sunrise. On the other hand, Lantang’s Tserko Ri, which is far higher up, provides equally stunning vistas.

The most popular walk is to Kyanjin Ri, but there is also a far more difficult and uncommon option to climb Tserko Ri. It’s a fantastic option for hikers looking for a challenge. The Kyanjin Gompa is dwarfed by the Tserko Ri summit. There is an almost 1500 m vertical increase from the summit to the apex. This compensates for an extremely challenging last push. It’s not an insurmountable effort, though. 

Trekkers hardly ever visit the unexplored section of Lantang Valley. Walking through a place this unexplored makes for a very thrilling experience. We’ll give you a brief overview of what to expect on your Trek to Lantang here.
 

Highlights

Take on a challenging hike to the astounding elevation of 5033 meters. 
Reach an unspoiled natural area where you may enjoy vistas that extend all the way to Tibet and snow-capped peaks like Lantang. 
Explore mani walls, Chortens, and historic monasteries. 
Engage in conversation with the locals to learn more about Tibetan culture. 
Trek across the alpine forests of Nepal, passing through stands of birch, pine, and rhododendron. 
excellent opportunity to observe up close the wildlife, unique birds, and other Himalayan species found in Nepal.
 

Permits needed to reach Tserko Ri

Only the standard permissions required for the Langtang Valley trek are needed for the Tserko Ri hike. To enter the Langtang National Park, you need an admission permission. It is also necessary to have a Trekker’s Information Management System Permit (TIMS). The TIMS permit is used for all kinds of long treks in Nepal.
 

Best time to visit Tserko Ri

Traveling to Tserko Ri is best done in the months of March through April and October through November. There are two seasons during these months: spring and autumn. This is the best time of year for trekking because there won’t be any mud or dangerous trails. The temperature will be moderate and the weather will be less turbulent. In addition, you’ll be treated to spectacular, unobstructed views with unclouded blue skies throughout specific months. The trails will be crowded with hikers at these times, though, as these are the most popular times for trekking. We advise making reservations in advance!
 

How to reach Tserko Ri?

To reach the Tserko Ri, you have to hike for three to four hours every day for almost a week over the Langtang Valley. The walking route will begin at Syabrubesi. It just takes seven hours by car to get from Kathmandu to Syabrubesi. You’ll pass through valleys, historic hamlets, and subtropical forests along the way. You will pass through rivers that flow and rugged hills as you journey downward. The trail ends at the Lama Hotel after a few nearly identical climbs and descents. Terrace farms flank the hotel, which is lined with birch trees on both sides. 
From Lama Hotel, your hike to Tserko Ri will formally begin. There will be multiple dense forests and meadows during the hard climb. The paths are wider once you pass the small river valley at Ghoda Tabela. You will also pass through Chyamki village, which is a great site to visit for sightseeing, on the walk.
 

You walk past ancient Chortens, mani walls, and prayer wheels on your way onward. It also offers a fantastic chance for cultural and educational encounters. Strolling through Langtang village, you will see several of these hamlets as well as places where water mills are located. The initial occupants of the Lantang village were the Tamang people. Thus, the majority of the settlements in the area are Tamang. Tibetan monasteries and chortens can be found here. Trails from this point traverse a number of small plateaus that are home to yak pastures.
 

As you head out of Langtang Trekking, Tserko Ri will become closer. You will pass by several remote communities along the way that have prayer wheels and holy rocks. After some strenuous walking, you will arrive at Kyanjin Gompa, your next destination. Getting acclimated to the altitude and weather here may take some time. 

Stunning vistas may be found in abundance at the Kyanjin Gompa. It is possible to observe views of the tall mountain peaks and the valleys. Here you can relax and get used to the altitude before heading to the highest peak and our ultimate target, Tserko Ri. The approach to Tserko Ri will gradually increase in elevation. You will be traveling over rough terrain.  After hiking uphill for six to eight hours from Kyanjin Gompa, you can reach the summit of Tserko Ri. You will need to climb a nearly 1500-meter-long steep summit to reach the summit’s ultimate location. You will then have the good fortune to reach the Tserko Ri point and gaze in wonder at the horizon. This location offers stunning views of the mountains. Cho Oyu, Shishapangma, Lhotse, Makalau, and the Latang range are a few of the prominent ones. The surrounding valleys, craggy mountains, verdant hills, and glacier moraines all seem quite lovely from this vantage point.

Continue Reading

Travel

Travel Fatigue: Effective Ways to Beat Tiredness After a Long Haul Flight

Published

on

By

Travel Fatigue: Effective Ways to Beat Tiredness After a Long Haul Flight

Travel fatigue is a common occurrence for many travelers, especially those who have just returned from a long haul flight. It can leave you feeling physically and mentally exhausted, making it difficult to fully enjoy your trip or adjust to the new time zone.

In this article, we will discuss some effective ways to beat travel fatigue and make the most out of your trip.

What Causes Travel Fatigue?

Travel fatigue is mainly caused by disruptions to our body’s natural sleep-wake cycle, also known as our circadian rhythm. This can happen when traveling across different time zones, leading to jet lag. The longer the flight, the more severe the symptoms may be.

Other factors that contribute to travel fatigue include:

  • Lack of quality sleep on the plane due to uncomfortable seating or loud noises
  • Dehydration from low humidity levels in airplane cabins and not drinking enough water
  • High altitude and changes in air pressure can also affect our bodies
  • Stress and anxiety related to traveling or tight schedules
  • Lack of physical movement during the flight leading to stiffness and muscle aches

Effective Ways to Beat Travel Fatigue

When you arrive at your destination feeling exhausted and jet-lagged, it can be tempting to just crawl into bed and sleep. However, there are some simple ways to combat travel fatigue and get your body back in sync with the new time zone.

Adjust Your Sleep Schedule Before You Leave

If you know you will be traveling across different time zones, try adjusting your sleep schedule a few days before your trip. This can help ease the effects of jet lag by gradually transitioning your body to the new time zone.

Stay Hydrated

As mentioned earlier, dehydration is a common cause of travel fatigue. Make sure to drink plenty of water before, during, and after your flight. Avoid alcohol and caffeine, which can dehydrate you even more.

Move Around During the Flight

Sitting in a cramped airplane seat for hours can leave your body feeling stiff and achy. Make sure to get up and move around every few hours to stretch your muscles and improve blood circulation. You can also do some simple exercises at your seat, such as rotating your ankles or doing neck rolls.

Take a Nap

If it is nighttime at your destination when you arrive, try to take a short nap to help you adjust to the new time zone. However, make

sure your nap is not too long, as this can make it harder to adjust to the new time zone. Aim for a 20-30 minute power nap to refresh yourself without disrupting your sleep schedule.

Consider Using Essential Oils and Other Natural Remedies

Some essential oils, such as lavender and peppermint, have calming and energizing properties that can help alleviate travel fatigue. You can also use a CBD topical roll on and apply it to your temples, neck, and wrists for relaxation.

Other natural remedies like melatonin supplements or herbal teas can also aid in promoting relaxation and sleep.

Get Some Sunlight

Exposure to natural sunlight can help reset your body’s internal clock and regulate the production of the hormone melatonin, which helps with sleep. If possible, try to spend some time outdoors during daylight hours at your destination.

Stay Active

Engaging in physical activity during the day can also help combat travel fatigue. Take a walk, go for a swim, or participate in some other form of exercise to boost your energy levels and improve your mood.

Stick to a Healthy Diet

Eating nutritious meals and avoiding heavy or greasy foods can help prevent feelings of sluggishness and fatigue. Fueling your body with healthy foods will give you the energy you need to explore and enjoy your trip.

Conclusion

Travel fatigue is a common side effect of long-haul flights, but it doesn’t have to ruin your trip. By following these tips, you can beat travel fatigue and make the most out of your travels. Remember to prioritize rest and self-care, stay hydrated, and engage in activities that will help you adjust to the new time zone.

Continue Reading

Travel

A Summer Dream in Mykonos: Private Pools, Vibrant Nights, and New Obsessions

Published

on

By

A Summer Dream in Mykonos: Private Pools, Vibrant Nights, and New Obsessions

Last summer, I had the incredible opportunity to visit Mykonos for the first time, and it was an experience I’ll never forget. From the moment I arrived on this enchanting Greek island, I knew I was in for something special. Mykonos greeted me with its whitewashed buildings glistening under the Mediterranean sun, its narrow cobblestone streets inviting me to explore, and its vibrant atmosphere promising adventures at every turn.

Experiencing Private Pool Luxury

Among the highlights was staying at a Mykonos hotel with private pool. It was my first time indulging in such luxury, and the feeling was nothing short of extraordinary. Imagine waking up each morning, stepping out onto a sun-drenched terrace, and diving into your very own crystal-clear pool. The privacy and exclusivity of having a pool all to myself made every moment special. It was a little slice of paradise right outside my room, a perfect blend of relaxation and extravagance.

Vivid Nightouts in Chora

My days in Mykonos were serene and relaxing, but the nights were an entirely different story. Chora, the bustling heart of Mykonos, came alive after sunset. The narrow, winding streets were filled with a lively mix of locals and tourists, all ready to experience the island’s famed nightlife. I found myself hopping from one vibrant bar to another, each offering its unique charm and atmosphere. The energy was infectious; people were dancing, laughing, and enjoying the warm summer nights. Every bar seemed to have its character, from chic and sophisticated lounges to lively and energetic dance spots. Those nights in Chora are some of the most vivid memories I have, filled with music, laughter, and the occasional cocktail too many!

The Amazing Parties at SantAnna Club

While Chora’s bars were a highlight, the real game-changer for my nightlife experience in Mykonos was the legendary parties at SantAnna Beach Club. Known for its extravagant beach parties, SantAnna did not disappoint. The club’s atmosphere was electric, with world-class DJs spinning tracks that kept the energy high all night long. The setting was perfect: a sprawling beach club with luxurious cabanas, a massive pool, and an open-air dance floor. It felt like the entire island had come together to celebrate under the stars. The vibe was unparalleled, and I found myself dancing until the early hours of the morning, surrounded by new friends and fellow partygoers.

My Favorite Beach: Elia Beach

When I wasn’t exploring Chora or partying at SantAnna, I spent my days soaking up the sun at Elia Beach. Elia quickly became my favorite spot on the island. The beach was stunning, with its golden sands and crystal-clear waters. It was less crowded than some of the other famous beaches, offering a more tranquil and relaxing environment. I loved lounging on the comfortable sunbeds, sipping on a refreshing cocktail, and occasionally taking a dip in the inviting sea. The serene beauty of Elia Beach was the perfect counterbalance to the vibrant nightlife, offering a peaceful retreat where I could unwind and enjoy the natural beauty of Mykonos.

A New Obsession: Moussaka

One of the unexpected highlights of my trip was discovering a new obsession: moussaka. Before visiting Mykonos, I had tried moussaka a few times, but it wasn’t until I tasted it on the island that I truly fell in love with this traditional Greek dish. The layers of perfectly cooked eggplant, rich and flavorful minced meat, and creamy béchamel sauce were nothing short of divine. I made it a mission to try moussaka at every restaurant I visited, and each version was a delightful surprise. The flavors were comforting and indulgent, and I found myself craving it long after I returned home.

A Summer to Remember

My summer in Mykonos was an unforgettable blend of luxury, excitement, and discovery. Staying at a Mykonos hotel with private pool added a touch of indulgence to the trip, making each moment feel special. The nights spent exploring Chora’s vibrant bars and dancing at SantAnna’s epic parties were thrilling, and filled with laughter and unforgettable memories. Relaxing days at Elia Beach provided the perfect balance, offering a serene escape in a stunning setting. And, of course, discovering my love for moussaka added a delicious twist to the adventure.

As I reflect on that incredible summer, I’m filled with gratitude for the experiences I had and the memories I made. Mykonos, with its enchanting blend of relaxation and revelry, truly captured my heart. It’s a place I’ll return to again and again, always seeking new adventures and reliving the magic of those unforgettable days and nights.

Continue Reading

Trending

Copyright © 2017 Zox News Theme. Theme by MVP Themes, powered by WordPress.